Home / Blog / Health & Wellness
9 Best Exercises for Lower Back Pain & Waist Pain Relief: Physiotherapist-Approved

Lower back and waist pain affects millions of people worldwide, often caused by poor posture, sedentary lifestyles, muscle imbalances, or injury. Whether you're dealing with chronic discomfort, a recent strain, or stiffness from long hours of sitting, the right exercises can make a significant difference. In this guide, we’ve compiled the best physiotherapist-approved exercises for waist and lower back pain relief to help you recover, strengthen your core, and improve your flexibility—all from the comfort of your home.
These safe and effective movements target the key muscle groups responsible for spinal support and mobility. With consistency, you can relieve tension, prevent future flare-ups, and restore your body’s natural alignment. Whether you're a beginner or looking to complement physical therapy, these exercises are ideal for all fitness levels.
Top Exercises for Lower Back Pain & Waist Pain Relief
1. Cat-Cow Stretch (Spinal Mobility)
The Cat-Cow Stretch is a gentle, rhythmic exercise rooted in yoga practice that promotes spinal flexibility, relieves tension in the lower back, and encourages better postural awareness. It's especially effective for people who sit for long hours or experience stiffness in the waist and lumbar region.
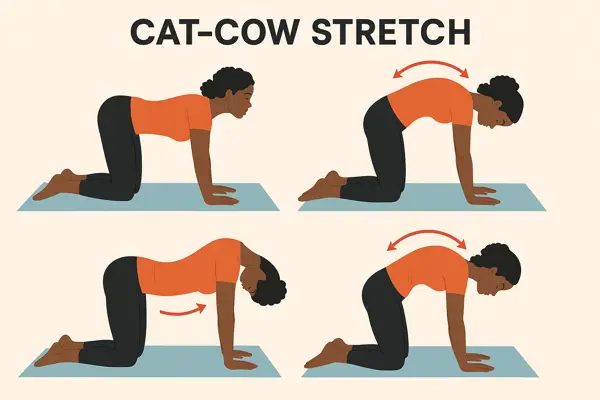
How to Perform:
- Start Position (Neutral Spine): Begin on all fours—hands directly under shoulders, knees under hips, back flat, and neck neutral.
- Cow Pose (Inhale): Slowly arch your back downward as you lift your chest and tailbone upward. Let your belly drop toward the floor and gaze gently upward.
- Cat Pose (Exhale): Reverse the movement by tucking your tailbone under, rounding your spine upward, and pulling your belly toward your spine. Drop your head to look at your thighs.
- Repeat Slowly: Flow through this movement with your breath—inhale for Cow, exhale for Cat. Perform for 8–10 slow, controlled reps.
Key Benefits:
- Enhances spinal flexibility and mobility
- Improves postural alignment
- Gently activates abdominal muscles
- Reduces stiffness and relieves lower back pain
- Encourages mindful breathing and stress relief
💡 Tip: Use a yoga mat or soft surface to protect your knees and wrists while practicing.
2. Glute Bridges – Strengthen Your Core & Support Your Lower Back
The Glute Bridge is a powerful, low-impact exercise that directly strengthens the glutes, hamstrings, and core muscles, which play a key role in supporting the lower back and improving overall posture. This movement is highly recommended by physiotherapists for those experiencing waist pain, lumbar strain, or back instability.
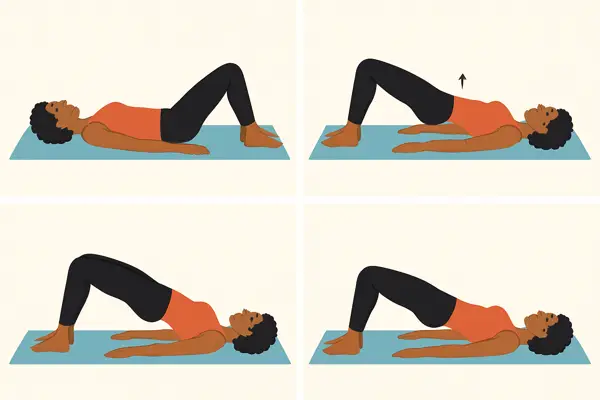
How to Perform:
-
Start Position:
-
Lie on your back with your knees bent, feet flat on the floor hip-width apart.
-
Keep your arms at your sides, palms facing down.
-
-
Engage Core & Glutes:
-
Tighten your abdominal muscles and squeeze your glutes.
-
-
Lift:
-
Slowly raise your hips toward the ceiling until your body forms a straight line from shoulders to knees.
-
Avoid overarching your back—focus on using your glutes.
-
-
Pause & Lower:
-
Hold the position for 2–3 seconds at the top, then gently lower your hips back down.
-
Repeat for 10–15 reps, and aim for 2–3 sets.
-
Key Benefits:
- Strengthens gluteus maximus, reducing pressure on the lower back
- Improves hip mobility and pelvic stability
- Helps correct postural imbalances
- Safe for most people with chronic back pain or sedentary lifestyles
- Ideal for core rehabilitation and injury prevention
💡 Tip: Don’t rush through reps. Controlled movement ensures better muscle activation and safety.
3. Child’s Pose – Gently Decompress Your Spine
Child’s Pose (Balasana in yoga) is a deeply restorative stretch ideal for relieving waist pain, lower back tension, and spinal compression. It is often used as a resting posture in yoga routines and physical therapy sessions due to its calming effect on both the mind and body.
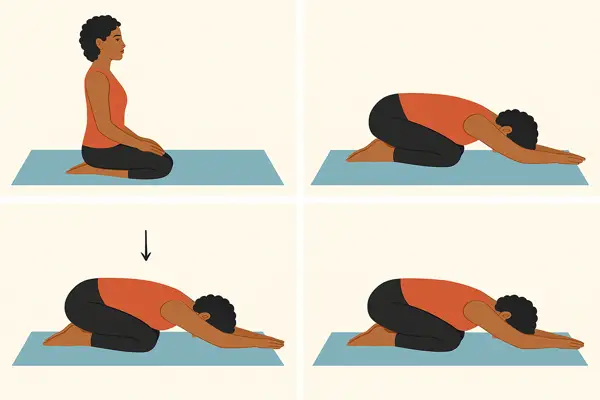
How to Perform:
-
Kneeling Start Position:
-
Kneel on a soft surface or mat, with your big toes touching and knees slightly apart.
-
Sit back on your heels with your torso upright.
-
-
Fold Forward:
-
Gently lower your torso forward, bringing your forehead to rest on the mat.
-
Extend your arms straight ahead or let them rest by your sides.
-
-
Relax and Breathe:
-
Let your chest melt toward the floor and feel your hips sink back.
-
Breathe deeply and stay relaxed in this position for 30–60 seconds.
-
-
Return to Start:
-
Slowly walk your hands back and roll your spine up to return to kneeling.
-
Key Benefits:
- Gently stretches the lumbar spine, hips, and thighs
- Relieves tension from the waist area caused by prolonged sitting or standing
- Promotes relaxation, reducing stress-related back tightness
- Enhances spinal flexibility and decompresses the vertebrae
- Safe and accessible for all fitness levels, including beginners and seniors
💡 Tip: Place a pillow or yoga block under your chest or forehead for added support if you have tight hips or knees.
4. Pelvic Tilts – Rebuild Core Control & Ease Lumbar Pain
Pelvic Tilts are a foundational rehab exercise commonly prescribed by physiotherapists to relieve lower back pain and waist stiffness. This gentle movement enhances core engagement, reeducates spinal alignment, and can be safely performed by beginners, seniors, and even post-surgical patients.
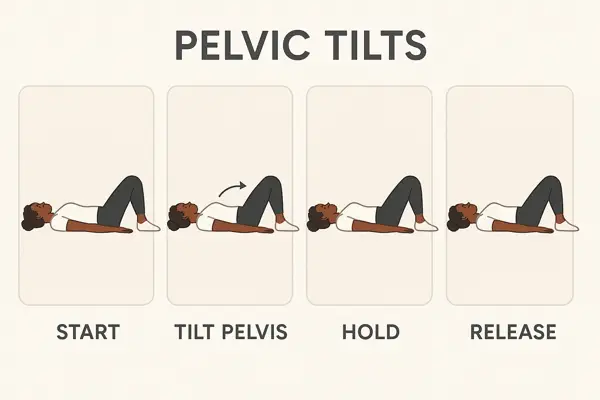
How to Perform:
-
Start Position:
-
Lie on your back with your knees bent, feet flat on the ground.
-
Keep your arms by your side and maintain a neutral spine (natural curve at the lower back).
-
-
Tilt Pelvis:
-
Engage your abdominal muscles and gently flatten your lower back against the floor by tilting your pelvis upward.
-
Imagine you’re pulling your belly button toward your spine.
-
-
Hold the Position:
-
Maintain the tilt for 5–10 seconds while breathing normally.
-
Focus on controlled activation, not forceful movements.
-
-
Release:
-
Slowly return to the neutral spine position, allowing the natural curve of your lower back to return.
-
Repeat for 10–15 reps, progressing to 2–3 sets.
-
Key Benefits:
- Strengthens the transverse abdominis and other deep core muscles
- Improves lumbar stability and spinal alignment
- Eases tension in the lower back and hips
- Supports injury prevention and long-term back health
- Especially beneficial for desk workers, seniors, or postpartum recovery
💡 Tip: Place a small folded towel under your lower back at the start if you're unsure whether you're moving correctly—it should flatten when you tilt.
5. Knee-to-Chest Stretch – Lengthen the Spine & Release Lower Back Tension
The Knee-to-Chest Stretch is a classic, gentle stretch that helps elongate the lower back, release tight glutes, and alleviate pressure on the lumbar spine. It's often used in rehabilitation programs and recommended by physiotherapists for easing waist pain, sciatica, and lower back stiffness.
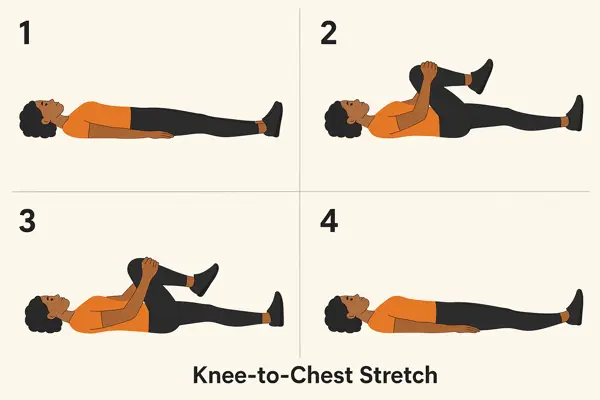
How to Perform:
-
Starting Position:
-
Lie flat on your back with your legs extended and arms relaxed at your sides.
-
-
Draw One Knee In:
-
Bend your right knee and gently pull it toward your chest using both hands.
-
Keep the other leg extended on the floor.
-
-
Hold the Stretch:
-
Hold the position for 20–30 seconds, breathing deeply and relaxing your back muscles.
-
Ensure your shoulders and head remain flat on the floor.
-
-
Release & Switch:
-
Gently lower the right leg back to the ground.
-
Repeat on the left leg.
-
Do 2–3 rounds on each side.
-
💡 You can also perform a double knee-to-chest variation by pulling both knees in at once for a deeper stretch.
Key Benefits:
- Stretches the erector spinae and gluteal muscles
- Reduces lumbar stiffness and eases sciatic nerve pressure
- Improves spinal mobility and hip flexibility
- Can help reduce morning back pain and increase circulation
- Very gentle and suitable for all fitness levels, including those with chronic back pain or recovering from injury
6. Seated Forward Fold – Stretch the Spine & Hamstrings
The Seated Forward Fold is a calming and effective stretch that targets the entire back body—from your calves and hamstrings to your lower spine. It is often recommended to relieve tension in the waist, lumbar spine, and hips, especially when tight hamstrings are contributing to lower back discomfort.
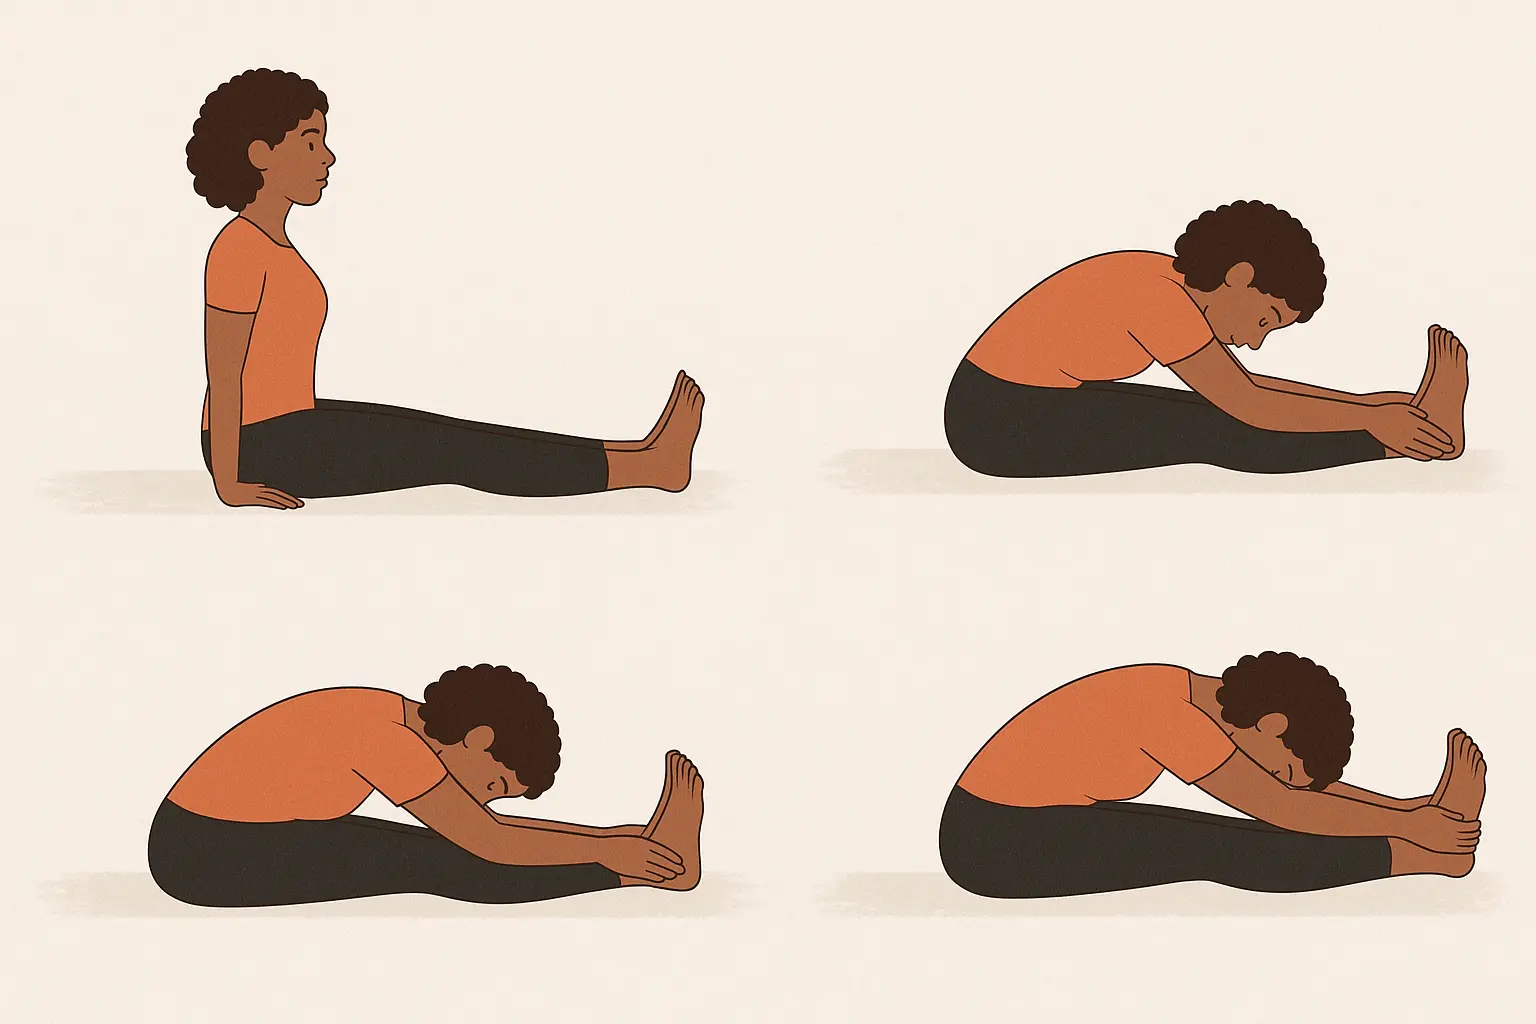
How to Perform:
-
Starting Position:
-
Sit on the floor with your legs extended straight in front of you.
-
Flex your feet gently (toes pointing up) and sit tall with a neutral spine.
-
-
Reach Forward:
-
Inhale and lift your arms overhead, elongating your spine.
-
Exhale and hinge at your hips (not the waist), reaching forward toward your feet.
-
-
Grip and Hold:
-
Reach for your toes, ankles, or shins—wherever your flexibility allows.
-
Keep your spine as straight as possible, and avoid hunching your shoulders.
-
-
Deepen the Stretch:
-
With each exhale, allow your chest to gently draw closer to your thighs.
-
Hold the position for 20–30 seconds, breathing deeply.
-
-
Return Slowly:
-
Inhale and lift your torso back up to the starting seated position with control.
-
Key Benefits:
- Stretches the lower back, spine, hamstrings, and calves
- Reduces lumbar tightness and eases nerve compression
- Improves flexibility in the posterior chain (back of body)
- Supports postural correction for those with a slouched lower back
- Promotes relaxation and stress relief through deep breathing
💡 Tips for Beginners:
Use a yoga strap around your feet if you can’t reach them comfortably.
Sit on a folded blanket or cushion to elevate your hips and improve posture.
Focus on maintaining a long spine, rather than how far forward you can reach.
7. Wall Sits – Build Endurance & Support Your Spine
Wall Sits are a simple yet effective bodyweight exercise often used in physiotherapy, rehab routines, and strength training. They engage the quadriceps, glutes, hamstrings, and core muscles, helping to stabilize the pelvis and lower back. This improved muscular support can significantly reduce chronic waist pain and enhance posture.
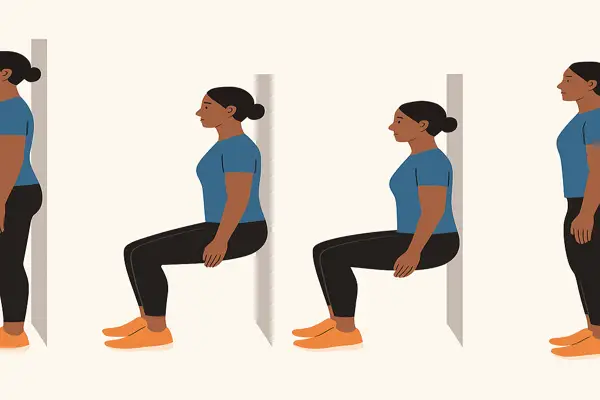
How to Perform:
-
Find a Wall:
-
Stand with your back flat against a wall, feet about 2 feet away from the base.
-
Your feet should be hip-width apart, and arms relaxed at your sides.
-
-
Slide Down:
-
Slowly slide your back down the wall until your thighs are parallel to the ground, forming a 90° angle at your knees.
-
Keep your knees directly above your ankles—not past your toes.
-
-
Hold the Position:
-
Press your lower back into the wall.
-
Engage your core, glutes, and thighs.
-
Hold the position for 20–45 seconds to start. Over time, increase up to 1–2 minutes.
-
-
Return Safely:
-
Slide back up the wall slowly until you're standing upright.
-
Rest, then repeat for 2–3 sets.
-
Key Benefits:
- Strengthens leg and glute muscles that support the spine
- Enhances core endurance, reducing lower back strain
- Promotes postural alignment and pelvic stability
- Great for people with desk jobs or weak lower body support
- Requires no equipment and can be done anywhere
💡 Tip: Place a stability ball between your back and the wall for a smoother descent or to relieve pressure if you're new to wall sits.
8. Bird-Dog – Strengthen Core Stability & Relieve Back Pain
The Bird-Dog is a dynamic core stabilization exercise that promotes balance, coordination, and spinal alignment. It targets the lower back, glutes, shoulders, and abdominals, making it especially effective for those struggling with waist pain, postural instability, or recurrent back strain.
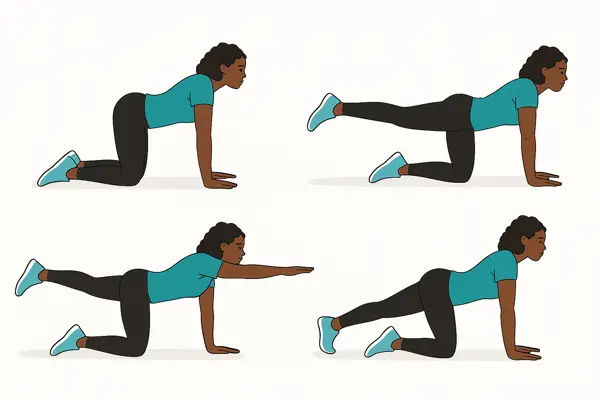
How to Perform:
-
Get Into Tabletop Position:
-
Start on your hands and knees.
-
Align your wrists under your shoulders and your knees under your hips.
-
Keep your spine neutral and core engaged.
-
-
Extend Opposite Arm & Leg:
-
Simultaneously extend your right arm forward and left leg back.
-
Maintain a straight line from fingers to toes without tilting your hips or arching your back.
-
-
Hold for Balance:
-
Pause and hold for 3–5 seconds, keeping your body steady.
-
Focus on engaging your core and glutes.
-
-
Return and Switch:
-
Slowly return to the starting position.
-
Repeat with the left arm and right leg.
-
Perform 8–12 reps per side, for 2–3 sets.
-
Key Benefits:
- Improves core stability and balance
- Strengthens lumbar spine and glute muscles
- Reduces risk of lower back injuries
- Supports posture correction and spinal alignment
- Perfect for beginners and safe for those in rehab or postural therapy
💡 Tip: Place a yoga block on your lower back and try to keep it from falling to train proper spinal alignment.
9. Cobra Stretch – Open the Spine & Relieve Lumbar Tension
The Cobra Stretch (also known as Bhujangasana in yoga) is a gentle backbend that targets the lower back, abdominals, and chest. It helps counteract the effects of prolonged sitting, forward-slouching, and spinal stiffness — making it one of the most effective stretches for waist and lower back pain relief.
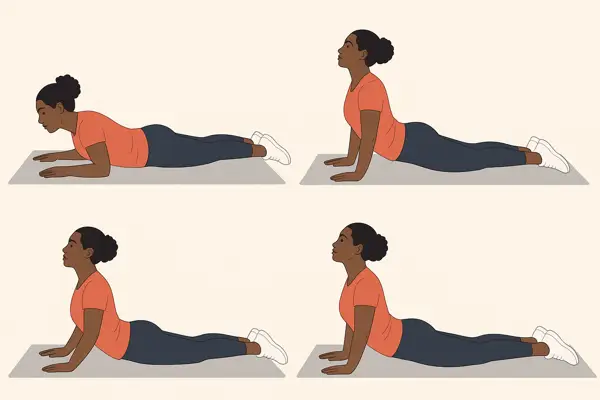
How to Perform the Cobra Stretch:
-
Start Lying Face Down
-
Lie flat on your stomach with legs extended behind you, feet hip-width apart, and the tops of your feet resting on the floor.
-
Place your hands under your shoulders, elbows tucked close to your body.
-
-
Engage Core and Lift Chest
-
Inhale and slowly press into your hands to lift your chest off the ground.
-
Keep your hips and legs relaxed, and lift only as far as is comfortable.
-
Your elbows can remain slightly bent at first.
-
-
Open the Chest and Lengthen the Spine
-
Draw your shoulders back and down away from your ears.
-
Gaze slightly upward without compressing your neck.
-
Keep your pelvis in contact with the floor.
-
-
Hold and Breathe
-
Maintain the position for 15–30 seconds while breathing deeply.
-
Slowly lower back down on an exhale.
-
Repeat 2–3 times, resting in between.
-
Key Benefits of Cobra Stretch:
- Relieves lower back stiffness and improves spinal flexibility
- Opens the chest and shoulders, improving posture
- Stimulates abdominal organs, aiding digestion
- Reduces sciatica pain and decompresses vertebrae
- Calms the mind and promotes relaxation through deep breathing
💡 Tip: Avoid this stretch if you have a herniated disc or recent back surgery. Always consult a physiotherapist before starting new exercises if you're recovering from injury.
Back pain, especially around the lower back and waist, can significantly disrupt your daily life. However, with the right approach, consistent movement, and physiotherapist-approved exercises, you can reduce tension, restore flexibility, and strengthen your core. These stretches not only offer immediate relief but also support long-term spine health by improving posture, circulation, and muscle balance.
Incorporate these exercises into your daily routine—just 10–15 minutes a day can make a big difference. Remember to listen to your body, breathe deeply during each movement, and consult a medical professional if your pain persists or worsens.
Your journey to a pain-free back starts with one stretch at a time. Stay consistent, stay mindful, and your body will thank you!